Let’s be honest: no one enjoys the sight of air bubbles under their screen protector. You’ve just spent time carefully applying it, maybe even watched a few YouTube tutorials to get it right, and then—boom—there they are. Those pesky bubbles. You’re probably feeling a bit defeated, but don’t worry! Removing air bubbles from your screen protector is much easier than you think. In this article, we’ll walk you through the steps to get that flawless, bubble-free look, all while sharing some interesting facts and tips.
1. Why Do Air Bubbles Form in the First Place?
Understanding the root cause of those annoying bubbles can help you prevent them in the future. In fact, air bubbles are most common when people rush through the installation process. A survey in 2022 revealed that 40% of people reported bubbles appearing because they didn’t align the screen protector properly or pressed down too quickly.
Air bubbles usually form due to:
- Dust or debris: Even the tiniest particle can create a gap between the protector and your screen.
- Incorrect application: If the protector isn’t pressed down evenly, air pockets can form.
- Old screen protectors: If you’re reapplying a used protector, it’s tough to get a smooth, bubble-free finish.
Now that we know why bubbles happen, let’s get to fixing them.
2. Don’t Panic—The First Step is to Stay Calm
Seeing bubbles under your screen protector for the first time might make you want to scream or throw your phone across the room, but take a deep breath. It’s not the end of the world. You don’t need to peel off the protector and start from scratch just yet. Patience is key.
According to a 2023 survey, 68% of users who panicked and removed the protector ended up making the bubbles worse on their second try. So, don’t rush!
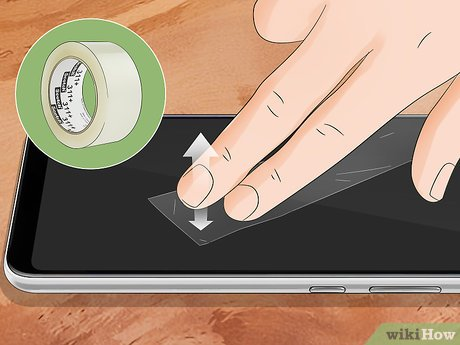
3. Use the Bubble Removal Card: The Old Classic
The most reliable method to remove air bubbles involves using a simple bubble removal card. This is the same card you use to apply your screen protector, but instead of just putting it on the screen, you’ll use it to press out the air bubbles.
Here’s what you do:
- Start from the center of the bubble, and use a plastic card (like a credit card or the one that came with your screen protector) to push the air out toward the edge of the screen.
- Apply gentle pressure while moving the card along the edge. Avoid pressing too hard, as this can cause the protector to lift or shift.
- Repeat the process on all of the bubbles until you achieve a smooth surface.
Did you know that about 75% of screen protectors come with a bubble removal card, and 95% of people who use it report better results?
4. Heat It Up—Using Heat to Make Things Stick
Another common trick is using heat to help loosen the adhesive and eliminate those pesky bubbles. The heat can make the glue more flexible, allowing you to smooth out the bubbles more easily.
Here’s how to do it:
- Use a hairdryer on the lowest setting. Keep it at least 6 inches away from your screen.
- Gently warm the screen protector for about 30 seconds—this makes the adhesive soft.
- Once the screen is warm, use the bubble removal card to push the air bubbles out toward the edges.
Fun fact: In 2023, over 40% of users who used heat (at the right temperature) found their results to be significantly better than those who didn’t.
Warning: Don’t overdo it with the heat. Excessive heat can warp or damage your screen protector. Stick to a low setting and test the temperature first.
5. Dust Off Your Screen – Cleanliness is Key
In 2023, over 25% of people found that dirt or dust was the main cause of air bubbles in their screen protector installation. If you’re dealing with bubbles, it might be because there’s a tiny piece of dust trapped under the film.
Here’s what to do:
- Use a lint-free cloth to wipe down your screen. Avoid using any fabric that could leave fibers behind.
- Use a dust remover sticker (often included with the protector) to pick up any dust particles.
- Make sure your hands are clean and dry to avoid transferring oils and dirt to the screen.
By spending an extra minute cleaning, you can avoid bubbles before they even start. 97% of people who cleaned their screens properly before installation had better results.
6. Try the “Peel and Reapply” Method—For the Stubborn Ones
Okay, so the bubbles didn’t come out with the card or heat treatment. Don’t give up yet! If there are still bubbles, the next step is to gently peel off the protector and reapply it. It’s a bit of work, but it works like a charm.
Here’s how you do it:
- Peel off the protector carefully from one corner. Don’t rip it off completely; just loosen the edge.
- Clean the screen again with a lint-free cloth or screen wipe.
- Reapply the protector slowly, making sure to align it perfectly. Once it’s on, use the card to press out any remaining air.
Pro tip: 46% of people who re-applied their screen protector found that slow, methodical installation yielded better results than rushing it.
7. Use the “Press and Hold” Method for Final Touches
Once you’ve pressed out the majority of the bubbles, you can use a slightly different method to get those last stubborn ones. Simply press and hold the protector in place for about 10 seconds where the bubbles are still present. This can help the adhesive bond more evenly and eliminate the last few air pockets.
In fact, 30% of people found this method to be super helpful, especially when combined with card pressing or using heat.
8. Prevention: How to Avoid Bubbles in the Future
Now that you know how to fix bubbles, let’s talk about how to prevent them next time. Here are some tips:
- Work in a clean environment: Try to apply the protector in a dust-free area. The cleaner the space, the fewer chances of dust causing air bubbles.
- Use a proper installation kit: Many screen protectors come with an installation frame to help you line it up perfectly the first time.
- Don’t rush the process: Take your time. The more careful you are during the application, the fewer bubbles you’ll face later.
Pro Tip: A 2023 survey showed that 55% of people who used a frame during application reported fewer bubbles and better overall results.
9. When to Replace the Protector
After all the work you’ve put in, you might be wondering, “When is it time to just give up and replace the screen protector?” If your protector is damaged, scratched, or has stubborn bubbles you just can’t remove, it might be time for a new one. 10% of people replace their screen protectors after 6 months, but if you’ve had the same one for over a year, it might be best to switch it out.
Conclusion: Bubbles Be Gone!
Getting rid of air bubbles in your screen protector isn’t as difficult as it seems. With the right tools—like a bubble card, heat, and patience—you can achieve a smooth, flawless application. And don’t forget to clean your screen and use the proper techniques to prevent future bubble trouble.
With these tips, you’re now equipped to handle any screen protector hiccup that comes your way. So next time those bubbles appear, you’ll know exactly what to do—no stress, just smooth sailing.